数据获取
地铁线路图geoJson数据获取,手动获取我们需要的地铁线路数据。
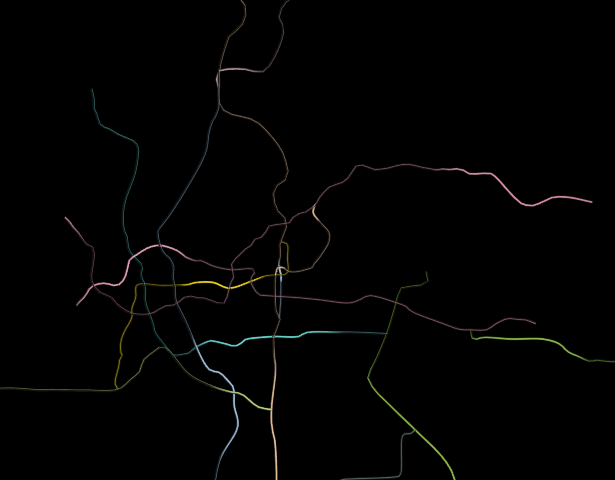
threejs 实现流光线路图效果
动态效果
演示地址
实例代码
<script>
import * as THREE from 'three';
import {OrbitControls} from 'three/examples/jsm/controls/OrbitControls';
import {geoJSON} from './data/data.js';
// 将这些对象定义为外部变量,使它们不成为响应式系统的一部分
let scene = null;
let camera = null;
let renderer = null;
let controls = null;
let mesh = null;
let meshes = [];
export default {
  data() {
    return {
      imageList: null,
      stats: null,
      texture: [],
      circleYs: []
    };
  },
  async mounted() {
    await this.loadImages();
    this.init();
  },
  methods: {
    async loadImages() {
      const imageNames = [
        'apm',
        'line1',
        'line2',
        'line3',
        'line4',
        'line5',
        'line6',
        'line7',
        'line8',
        'line9',
        'line13',
        'line14',
        'lineg'
      ];

      // 使用Promise.all和map来并行加载所有图片
      const images = await Promise.all(
          imageNames.map(async name => {
            const image = await import(`./assets/${name}.png`);
            return {name, image};
          })
      );

      // 将加载的图片转换为一个对象
      this.imageList = images.reduce((acc, {name, image}) => {
        acc[name] = image.default; // 或者根据实际情况调整属性
        return acc;
      }, {});
    },
    // 初始化
    init() {
      const el = this.$refs.map3DMain;
      this.initScene();
      this.initCamera();
      this.initRenderer(el);
      this.initOrbitControls();
      this.initRoadLight();
      this.setCameraFocus(); // 在初始化网格之后调用此方法
      this.animate();
      window.addEventListener('resize', this.onWindowResize);
    },
    initScene() {
      scene = new THREE.Scene();
      scene.background = new THREE.Color(0x000000);
    },
    initCamera() {
      const el = this.$refs.map3DMain;
      const width = el.clientWidth;
      const height = el.clientHeight;
      camera = new THREE.PerspectiveCamera(75, width / height, 0.1, 1000);
      camera.position.set(0, 100, 0);
      camera.up.set(1, 0, 0);
    },
    // 新方法以设置相机焦点
    setCameraFocus() {
      const box3 = new THREE.Box3();
      meshes.forEach(mesh => box3.expandByObject(mesh)); // 计算所有网格的边界盒

      const center = box3.getCenter(new THREE.Vector3());

      camera.position.x = center.x;
      camera.position.y = center.y + 100; // 调整相机的高度
      camera.position.z = center.z;

      controls.target = center; // 设置控件的焦点
      controls.update(); // 更新控件

      camera.lookAt(center);
    },
    initRenderer() {
      const el = this.$refs.map3DMain; // 获取元素引用
      const width = el.clientWidth; // 获取元素的宽度
      const height = el.clientHeight; // 获取元素的高度

      renderer = new THREE.WebGLRenderer({
        antialias: true
      });
      renderer.setClearColor(0xeeeeee, 1.0);
      renderer.setSize(width, height); // 使用元素的尺寸
      el.appendChild(renderer.domElement);
    },
    // 缩放
    initOrbitControls() {
      controls = new OrbitControls(camera, renderer.domElement);
      controls.addEventListener('change', this.render);
    },
    // 自适应
    onWindowResize() {
      const el = this.$refs.map3DMain;
      const width = el.clientWidth;
      const height = el.clientHeight;

      camera.aspect = width / height;
      camera.updateProjectionMatrix();
      renderer.setSize(width, height);
    },
    // 渲染
    render() {
      renderer.render(scene, camera); // 使用外部变量
      if (this.stats) {
        this.stats.update();
      }
      if (this.texture.length !== 0) {
        this.texture.forEach((item) => {
          item.offset.x -= Math.random() / 200;
        });
      }
    },
    // 动画
    animate() {
      this.render();
      requestAnimationFrame(this.animate);
    },
    // 流光效果
    initRoadLight() {
      geoJSON.features.forEach((item) => {
        let imgUrl = ''
        if (item.subway) {
          imgUrl = item.subway
        } else {
          imgUrl = 'line1'
        }
        const texture = new THREE.TextureLoader().load(this.imageList[imgUrl], function (tex) {
          tex.needsUpdate = true;
          tex.wrapS = tex.wrapT = THREE.RepeatWrapping;
          tex.repeat.set(1, 1);
        });
        // 材质
        let material = new THREE.MeshBasicMaterial({
          map: texture,
          side: THREE.BackSide,
          transparent: true
        });
        let points = []
        item.geometry.coordinates.forEach((itemTwo, key) => {
          points.push(new THREE.Vector3((itemTwo[1] - 23) * 300, 0, (itemTwo[0] - 113) * 300))
        })
        // 曲线
        let curve = new THREE.CatmullRomCurve3(points);
        // 创建管道
        let tubeGeometry = new THREE.TubeGeometry(curve, 100, 0.2, 20);
        mesh = new THREE.Mesh(tubeGeometry, material);
        meshes.push(mesh);
        scene.add(mesh);
        this.texture.push(texture)
        this.setCameraFocus();
      })
    }
  }
};
</script>
在这段代码中,initRoadLight() 函数的目的是在一个3D场景中创建具有流光效果的管道。流光效果通常是通过在3D对象的表面上应用动态变化的纹理来实现的。以下是实现流光效果的关键步骤:
加载纹理:使用
THREE.TextureLoader加载纹理图像。这里的imgUrl变量决定了加载哪个纹理图像。纹理更新:在纹理加载完成后,设置
tex.needsUpdate = true以确保纹理更新到场景中。纹理重复:通过设置
tex.wrapS和tex.wrapT为THREE.RepeatWrapping,纹理可以在水平和垂直方向上重复,这对于创建连续的流动效果很重要。纹理重复次数:通过
tex.repeat.set(1, 1)设置纹理在每个方向上的重复次数。如果要创建流动效果,可以动态改变这个值。创建材质:使用
THREE.MeshBasicMaterial创建材质,并将加载的纹理设置为材质的map属性。创建几何体:通过
item.geometry.coordinates获取坐标点,然后创建一个THREE.Vector3点数组。这些点用于定义一个THREE.CatmullRomCurve3曲线。创建管道:使用
THREE.TubeGeometry根据曲线创建管道几何体。创建网格:将管道几何体和材质结合,创建一个
THREE.Mesh对象。添加到场景:将创建的网格添加到3D场景中。
动态更新纹理:为了实现流光效果,需要在渲染循环中动态更新纹理的
offset或repeat属性,以模拟光沿管道移动的效果。
虽然代码中没有直接实现动态更新纹理的部分,但通常这是通过在渲染循环中调整纹理的 offset 属性来完成的,从而使纹理在管道表面上移动,创造出流动的光效。
更多threejs实例
实例代码下载
项目运行环境 vue3 vite js nodejs 14